Starting tomatoes from seed proves successful

img_4894

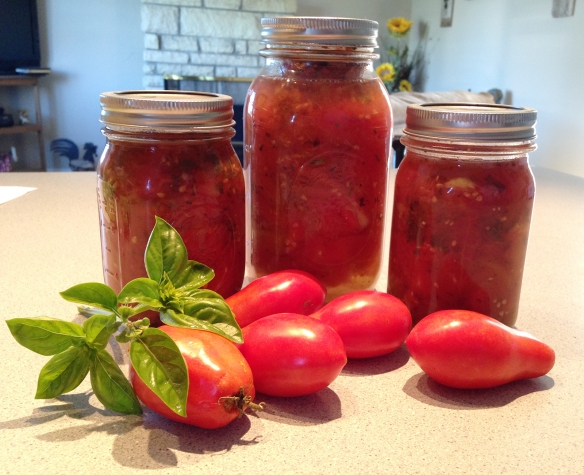
I don’t know about you, but I have tomatoes everywhere right now. My vegetable baskets are filled with them, they are on the kitchen counters and more are ripening by the day (at least they would if the sun would ever come back out here).

This is a good situation to be in though because last year my tomato plants lagged on producing tomatoes so our pantry was getting a little low on pasta sauce and other tomato-based items. It should be fully stocked after this year though.

I grow primarily Roma tomatoes for canning, with a few cherry tomatoes and one slicing tomato plant.

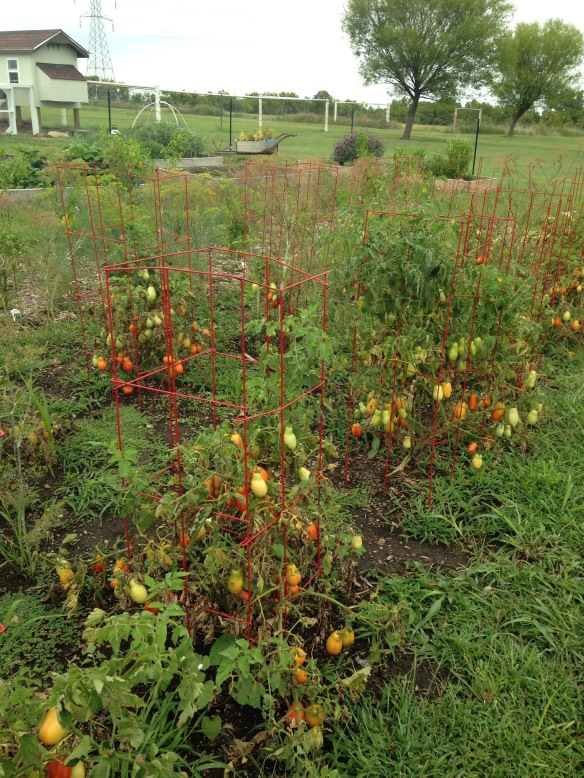
Last winter, I wrote about a new experiment I was trying with my greenhouse and starting all of my tomatoes from seed. I was thinking about that blog just the other day and realized I hadn’t followed up on it yet.img_4893

When I first put the tomatoes out, I was a little concerned because I had transplanted them into the largest pots I had for them, but they were still getting very root bound. The temperatures just weren’t warm enough yet for me to be comfortable putting them outside. So instead, I gave them the best care I could in the greenhouse but the leaves were starting to wilt just a little.

Finally, it was time to plant them. I kept my fingers crossed that they would all bounce back. After a few weeks in the ground, they did just that. All of my plants except the one that something ate and I had to replace, really took off once their roots had room to spread out. They grew into nice sized plants and they are producing more tomatoes than I think I have ever had, while many people in the area are having smaller amounts of tomatoes this year.

I know that I will be starting my tomatoes from seed again next year – but maybe a couple of weeks later in the year. I want to see if I have the same results two years in a row. If so, I will always be starting my plants from seeds from now on.

With all of these tomatoes, it’s time to start preserving them. I’ll begin sharing recipes and things I have discovered in my upcoming blogs.

Until next time, happy garden-fresh eating!

Julie Clements is a Butler County Master Gardener.
Share your ideas for garden-fresh recipes or ways to preserve at julieclements75@gmail.com and some will be featured in upcoming columns.


Enjoying the taste of dandelions 


While many people fight an ongoing battle to remove dandelions from their yard, I have always viewed them as a sign of spring. They are some of the first hints of color after a long, cold winter.

But they are more than just something to look at. Knowing they were edible, I set out to find ways to use dandelions, besides the soap I had made from them last year.

Dandelion Jelly sounded good and looked good from the information I found about it online.

So I set out to gather my dandelions. After a couple of times of picking, I soon realized the best time to pick is late morning. The dandelions are fully open and easy to spot at this time. This year, my yard has been covered with the bright yellow flowers, making picking fairly easy. For one batch of jelly, you will need to collect four cups of tightly packed dandelion heads. Then rinse them and let them dry for a bit. This will make the next step a lot easier.

You have to remove the yellow petals from the green leaves surrounding them. Some have said they use a knife and cut off the bottom of the dandelion, then remove the petals, but I found simply grasping the bottom of the flower in one hand and then plucking the yellow petals from the middle works pretty well. Sometimes you have to go back and pick a few of the leaves out if you got several, but a few doesn’t seem to make a difference. (I read that too many green leaves will make the jelly bitter.) You will have sticky, yellow fingers at the end of this process, but it’s worth the effort.

Once all of the petals are “plucked,” place them in a jar or bowl and pour four cups of boiling water over them. Place a lid or saucer across the bowl or jar to keep in the steam. Let this set for a minimum of two hours or even overnight, letting the petals steep.

After this is done, strain the liquid into a pan, removing all of the petals. Add one box of pectin and one quarter cup of lemon juice. Heat the mixture to boiling, then add three cups of sugar. Stir constantly and boil for one minute. Then pour the jelly into sterilized jars and process for five minutes in a water bath.

The jelly looks a bit like the Sunflower Jelly I made last summer, only a little darker and with a much richer and different taste. There is a hint of honey flavor in the jelly.

Until next time, happy garden-fresh eating!

Julie Clements is a Butler County Master Gardener. 

Crab apple delight

img_3599
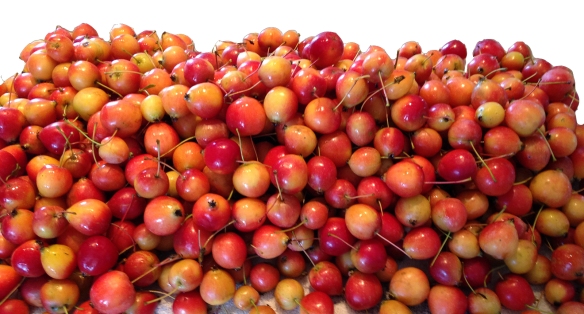
Fall brings a crispness in the air, changing leaves and crab apple pie. Yes, you heard right. Crab apple pie.

I discovered crab apples about three years ago and fell in love with the tartness they offer. I can never look at a regular apple pie the same way again.

Crab apples don’t ripen until around October, depending on the weather that year, and they have a fairly short window in which they are ripe enough to use, but not overripe.

During that time, I am picking and preparing apples in every spare moment I have.
There are four ways I have found to use the apples. My favorite (and the most labor intensive) is for pie filling. This takes a lot of apples and involves a lot of cutting, but it is worth it in the end. img_3646

I also like to make apple sauce and apple butter out of them. This is still work, but a lot easier than the pie filling. You will need a food mill, and if you can recruit an extra pair of hands or two, it speeds things up quite a bit. A side product from the apple sauce and butter is apple juice. You have to boil the apples quite a while to start with to soften them up. Once they are done, simply mix a little sugar into the leftover water to make a great juice.

All of these have the great taste of apples, with the extra bonus of the tart flavor of the crab apples.

Until next time, happy garden-fresh eating!

Crab Apple Pie Filling
(makes 7 quarts)img_3788

12 pounds apples, washed and cored
5 1/2 cups sugar
1 1/2 cups Clear Jel
1 T. cinnamon
1/2 tsp. nutmeg
1/8 tsp. ground cloves
5 cups apple juice
2 1/2 cups cold water
3/4 cup lemon juice

Cut sides off of apples, removing seeds and stem. Measure 33 cups. Then in a largeimg_3605 pot (I use a deep fry pan and basket), heat one gallon water to boiling and add one-third to half of apple slices, return to boiling and boil for one minute. Transfer apples to a large bowl, cover. Repeat with remaining apples.  Next, in a large pot, combine sugar, Clear Jel, cinnamon, nutmeg and cloves. Stir in apple juice and cold water. Cook over medium heat, stirring constantly, until mixture thickens and boils. Add lemon juice and boil one minute, stirring constantly. Remove from heat and stir in apples, mixing well. Spoon into hot quart jars, leaving one-inch head space. Process in water bath canner 25 minutes.

Crab Apple Sauce/Apple Butter

To prepare apples, wash, remove blossom and stem ends, then cut in half. Do not core. Mix 28 cups of apples and 16 cups of water in large pot, boil for 25 minutes. Strain liquid from the apples and set aside for apple juice. Then put the crab apples back in a pot and add 1/2 cup water for every 2 cups apples. Stir until well mixed and boil 3-5 minutes, stirring constantly. Put the pulp through a food mill to remove seeds and peels. This pulp is then used for apple sauce and butter.
For apple sauce: Combine 10 cups pulp and two cups sugar. Bring to a boil, then pour in jars and process 15 minutes for pints.
For apple butter: Combine 4 cups pulp, 2 cups sugar, 1 tsp. cinnamon, 1/2 tsp. allspice, 1/2 tsp. cloves in large pot. Boil, about 12 minutes, stirring constantly. To test, drop a bit of the mixture on a cold plate. If it is moulded, the apple butter is ready. Pour into jars and process in boiling water bath for 20 minutes for pints.

Julie Clements is a Butler County Master Gardener.
Share your ideas for garden-fresh recipes or ways to preserve at julieclements75@gmail.com and some will be featured in upcoming columns.

Enjoying watermelon in a different way

watermelon

I can’t think of anything that tastes more like summer than watermelon (except maybe Sunflower jelly). It’s refreshing, delicious and a great snack. Of course, you can have too much of anything, can’t you? I do this summer.

I was excited when I picked my first ripe watermelon. It was the first time I had successfully grown watermelon. I tried once before but they never seemed to be ripe. Cutting open that watermelon and seeing the juicy red inside was exciting.

I started eating, and eating, but there was still watermelon.

Not wanting it to go to waste, it was time to find something to do with it. I remembered flipping through my book of canning recipes before and seeing something with watermelon. After looking again, I found watermelon jelly, but it was made from the white rind of the watermelon. I still needed to find something to do with the rest.

A little more searching led me to find a watermelon jelly recipe that uses the fruit of the watermelon. That sounded like it would taste better too.

So I gathered the ingredients and created some jelly. It was tasty, but needed a few adjustments from the original recipe. I reduced the sugar a bit so it wasn’t so sweet, and left the pulp part of the watermelon in rather than straining the juice so I created a watermelon jam.

It was an easy process. You begin by chopping up the watermelon and removing all of the black seeds. (The recipe said you didn’t have to remove the white seeds, but I still took out as many as I could.). Then puree the watermelon in a food processor and measure out 2 cups of puree. Combine that with a box of pectin and a quarter cup of bottled lemon juice.

Bring that to a boil for a minute, then add 3 cups of sugar and bring to a boil, stirring constantly. Boil for one minutes and process it in a boiling water bath for 12 minutes. It is not only delicious, but also pretty to look at. My shelves of canned goods are getting much more colorful this year with the watermelon jelly and sunflower jelly.

Until next time, happy garden-fresh eating!

Julie Clements is a Butler County Master Gardener.

Share your ideas for garden-fresh recipes or ways to preserve at julieclements75@gmail.com and some will be featured in upcoming columns.

The taste of Sunflowers

14192166_10207060719423312_2807886119595570277_n

Driving home the other day I noticed the sunflowers I had been starting to see were now in full bloom. The bright yellow blossoms line the road to my house, as they do on many Kansas roads.

Looking at them I began to wonder. Surely, there is something you can do with those flowers. When I got home, I Googled uses for sunflowers. While I was sure you could make soap or something like that out of them, I was surprised to learn the petals on the flowers are edible, sometimes even used as a garnish on a salad.

Upon further investigation I found a recipe for Sunflower Jelly.

I set out with my measuring cup in hand and began to pick enough petals for my first batch of sunflower jelly. This was a much less painful process than the blackberries I’d picked earlier in the summer. No thorns, no scratches and no bleeding. It doesnimg_3286
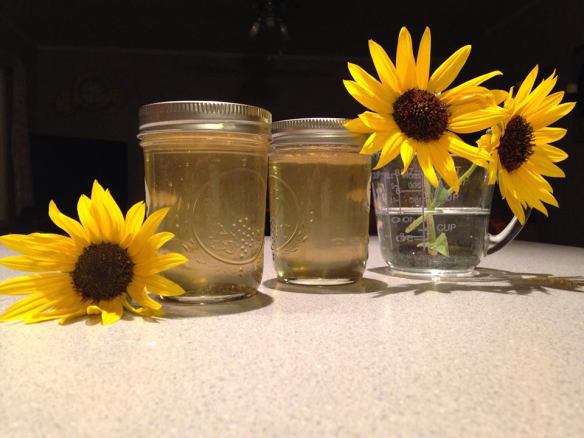
’t take long to gather enough petals.

Be cautious in your picking though because there also are Black-Eyed Susans in bloom right now and they look a lot like sunflowers. One way to tell the difference is by the leaves. According to Larry Crouse, K-State Research and Extension horticulture agent, the sunflower has heart-shaped leaves, while Black-Eyed Susans are long and slender. In addition, he said the Black-Eyed Susan (rudbeckia) also has a raised black center to the flower; it always has a black, or very dark, center; and it doesn’t develop the big seed load like a sunflowimg_3287er.

Once collected rinse the leaves and put them in a jar. To make the jelly, you pour 2 1/2 cups of boiling water over the 2 cups of petals and zest from one lemon, cover that with a saucer or lid and let it steep for two hours. Then strain the water off of the mixture and put in a pan. Add one box of pectin and a quarter cup of bottled lemon juice, then bring that to a boil. Once boiling, add 3 1/2  cups of sugar. Stirring constantly, bring that to a boil and let boil one minute. You can then fill your sterilized jars and process in a boiling water bath for five minutes.

* Note: Despite having the lemons, do not use fresh squeezed lemon juice in the jelly. I have read in other methods of preserving not to use fresh squeeze but rather bottled because it has a consistent acidity which is needed for canning.

img_3407-cutout-2After first tasting the jelly, I made the comment that “it tastes like summer.” I look forward to opening a jar when the temperatures are below freezing and there is snow on the ground, just to bring back just a bit of summer.

I also wanted to save some of those sunflower petals, so I collected more and dried them for about 12 hours on my dehydrator then sealed them in baggies for soaps and other uses.

I will research more this winter when canning season is over and I’m looking for something to do.

Until next time, happy garden-fresh eating!

Julie Clements is a Butler County Master Gardener.
Share your ideas for garden-fresh recipes or ways to preserve at julieclements75@gmail.com and some will be featured in upcoming columns.

Making homemade pickles and relish

IMG_3301

My cucumber vines are loving this weather we have been having. I seem to be picking at least 3-4 cucumbers a day off of just two vines. As the cucumbers began to stack up in my vegetable bowl, I decided it was time to do something with them.

Pickles and relish are two easy ways to preserve cucumbers for use throughout the year.
I have made pickles out of pickling cucumbers, as well as slicing cucumbers, which I tried this year.

It is recommended to use a pickling variety of cucumber, but I didn’t really know why until trying them both. The pickling cucumbers are firmer after they have been pickled, while the slicing ones are softer and a bit mushy. But the taste of both is the same, so you could use whatever you have on hand. When using slicing cucumbers I did pick them small though.

For both of these projects, I have found it easiest to buy mixes, although there are recipes out there if you want to do it from scratch. I’d rather have more time to spend on tomatoes though.

IMG_3179
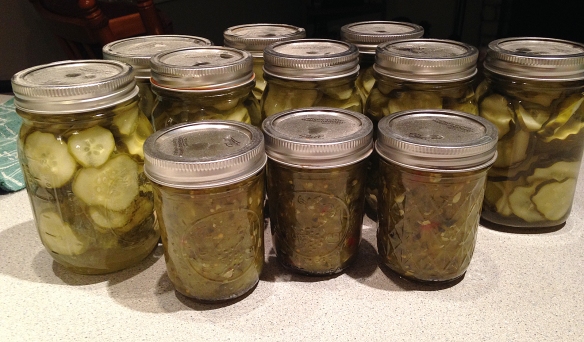
There are several varieties of mix out there for pickles. I went with the standard dill pickle mix. The relish mix is for sweet relish.

To make pickles, simply slice them about a 1/4 of an inch thick, then pack as many slices as you can into the jars. Then cook the mix as directed on the package and pour the brine into the jars until they are full. I have never had enough brine to do as many jars as the package says it will make. It’s usually about half as many so plan accordingly.

Then for the relish, chop up the cucumbers and put them in a food processor.IMG_3171 Blend until they are course pieces, but don’t go so far as to liquify it. Then cook the mixture as directed and pour into the jars and process according to the directions.

Until next time, happy garden-fresh eating!

Julie Clements is a Butler County Master Gardener. Share your ideas for garden-fresh recipes or ways to preserve at julieclements75@gmail.com and some will be featured in upcoming columns.

Saving those summer tomatoes for winter

IMG_3168

It’s that time of year that if you garden, you probably have tomatoes everywhere. Your counters are covered with them, bowls are filled with them and maybe, you can’t eat another one and the neighbors don’t want any more.

It’s a shame to let all of those delicious tomatoes go to waste. What better to do with them than preserve them so you can enjoy the fresh taste of the home-grown tomatoes in the middle of a cold, snowy winter day.

The easiest way is to can the tomatoes. This can be done by blanching them, peeling them and cutting them in half. I prefer to use Roma tomatoes to can over slicing tomatoes. I find they provide more tomatoes, less juice and if you’re making sauce, a thicker, richer pasta sauce.

So once you have dipped the tomatoes in boiling water for a couple of minutes, put them in ice water immediately. After they have cooled, peel them and start packing them in jars.

One important note is the level of acidity is important in preserving foods, so for tomatoes you have to add one tablespoon of lemon juice to each pint and two tablespoons to each quart jar. You also can add a half and full teaspoon of salt if you choose – I usually do.
Simply fill the jars until they are almost full. As you fill, use a spoon or other utensil to gently mash down the tomatoes to get the air out. Once full, wipe the rims, put the lids on and let them boil in a water bath for 85 minutes.

These tomatoes are great to use in chili, stews, spaghetti sauce and more. And they offer the ease of opening a jar, but the taste of the garden.

Last year I wanted to get a little more creative with my tomatoes, so I started adding some herbs. I took some dried oregano and put it in one jar and basil in another. Just add a small handful; you can use your own judgement. Then mix them in with the tomatoes before putting on the lid. They make a pretty jar of green and red when canned and taste good too. Are they better than simply adding the herbs as you cook the tomatoes in a recipe? I haven’t decided, but they are fun to make.

Until next time, happy garden-fresh eating!

Homemade Spaghetti Sauce

2 quart jars of tomatoes
handful of crushed basil and parsley
small handful of oregano
one pound hamburger
one medium onion, chopped
3 cloves garlic, crushed
salt and pepper to taste

Cook hamburger and drain grease, then continue to cook hamburger, onions and garlic until softened. Add the rest of the ingredients and simmer 30 min.

Julie Clements is  a Butler County Master Gardener.

Share your ideas for garden-fresh recipes or ways to preserve at julieclements75@gmail.com and some will be featured in upcoming columns.